 by
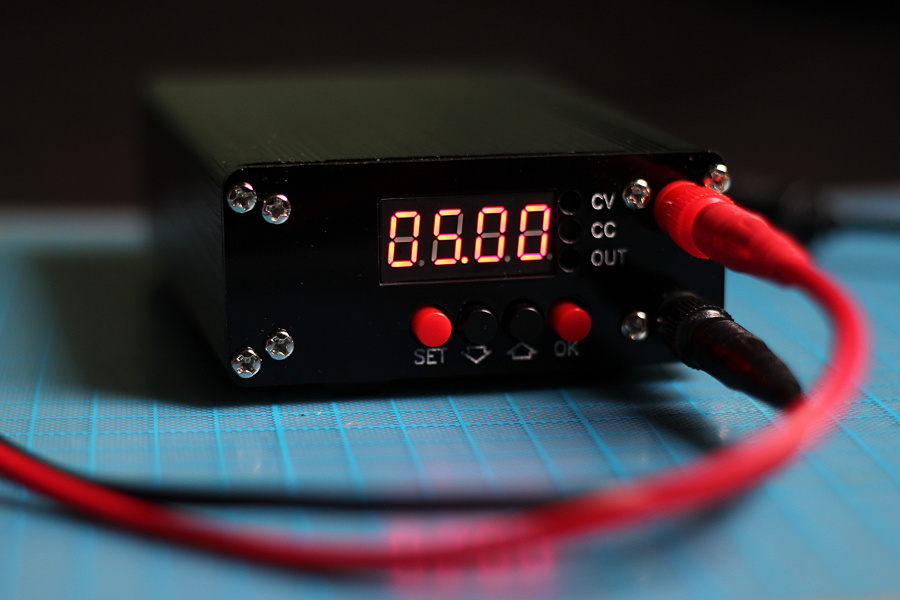
by So I’ve been fiddling a lot these days with Arduino’s SD Library. I’m doing experiments with SD Cards as part of my BOA (Brainfuck on Arduino) project and I already have a completely functional Brainfuck interpreter that runs on my Pro Mini board and uses a 23K256 (32KB) SPI RAM as BF “RAM space”.
The problem I’m trying to solve now is PROGRAM space (where the actual code will reside). So just for the kicks I”m testing SD Cards as a first “storage” alternative (after all it’s cheaper than EEPROM ICs and offers way more space than the few KB you’ll mostly get from EEPROMs).
(Click here to go directly to the MMC Problem and skip my particular project)
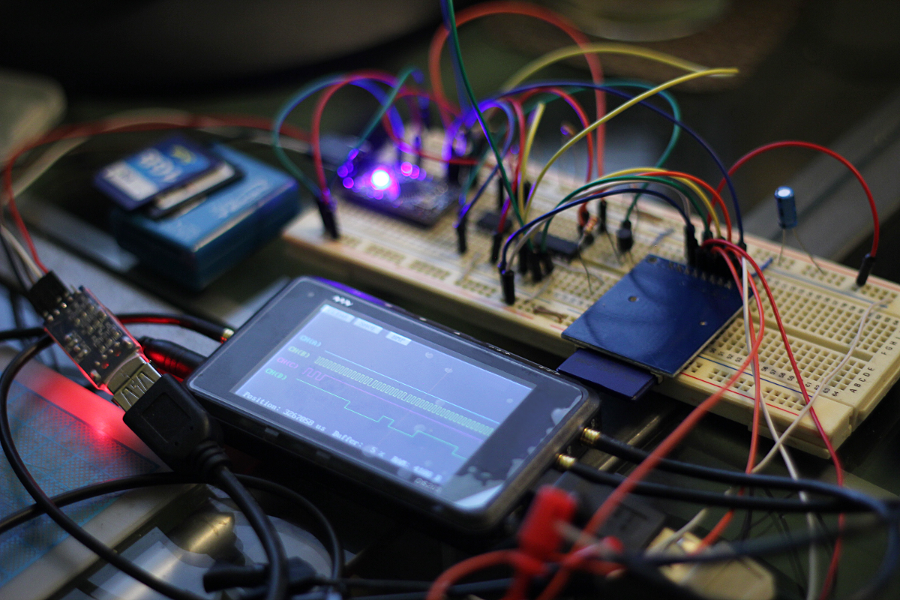
Both the RAM chip and the SD Card use SPI so they are actually sharing the bus, which greatly reduces the number of pins needed to drive both devices. Since there’s no way (nor need) to access the external RAM and the SD card at the same time I’m using a single SS (Slave Select) pin that’s connected to one of the devices and also to a transistor-based NOT gate that goes to the other, making the SS signal act as a “toggle” between both the SD Card and the RAM IC.
I also have my own SPI routines that give me complete control over the SS line, which is something that my “device toggle” solution requires.
Now let me tell you that I’ve tried Arduino’s libraries and the SdFat implementation simply rocks. It’s really easy to use and you can read files from SD cards formatted in FAT16 and FAT32. It supports SD1, SD2 and SDHC cards.
Making my Arduino read a text file from the SD Card was a breeze and it makes it easy to change the code that runs on the device:
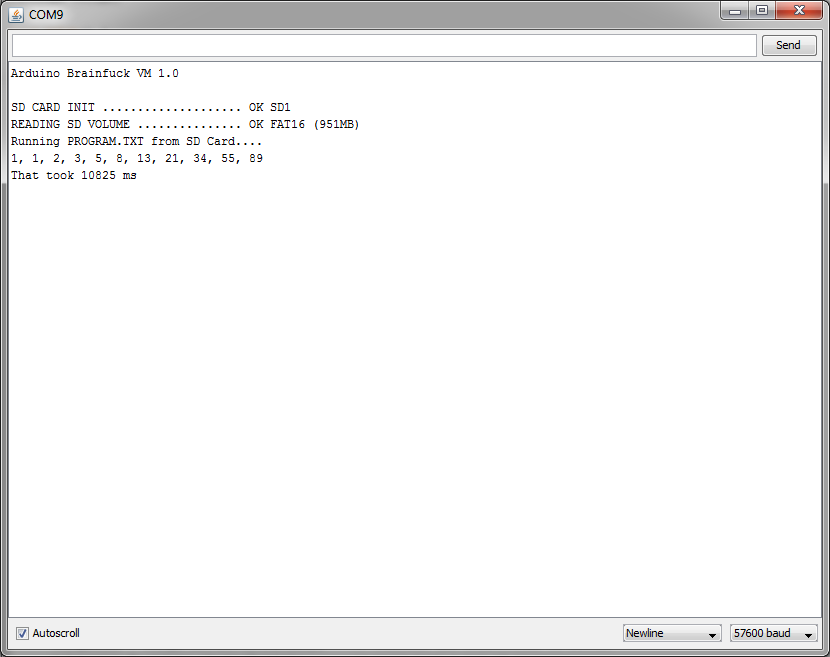
As expected, reading files from a filesystem that involves several data structures like logical volumes and partitions and tables require an awful lot of RAM. It’s also not particularly fast. A Brainfuck program that normally ran in 3 seconds when read from Arduino’s internal RAM took ~10.8 seconds when it was read from a text file inside the SD (~9.2 seconds with later SPI optimizations). That’s a hell of a penalty for just using a “high level” storage solution!
I’m now trying to directly work with block read/write operations to see if I can improve the performance with cached bock reads before ditching the idea of SD Cards entirely. To be honest I’m not expecting real performance improvements as the bottleneck is probably in the SD card communication protocol itself, not the filesystem, but I’m mostly continuing my experiments with SD Cards for learning purposes.
It was in this process that I happened to stumble into an interesting thing…
The MMC Problem
I have 4 “SD” cards here, and -curiously enough- they are all different types! I’ve got a 512MB SD2, a 1GB SD1, an 8GB SDHC… and an ancient 16MB (yes, MB) MMC.
Arduino’s SD Library has no problem reading the SD1, SD2 and SDHC card… BUT it fails miserably with the old MMC Card.
As I’m trying to develop my own quick and dirty SD access library (for low level cached block reads) I started studying the Simplified SD Specs and Arduino’s implementation. I’ve also been checking other sources like this REALLY helpful website.
The Arduino implementation closely follows the specs but it does not implement an oddity of old cards that Elm-Chan’s website explains rather succintly:
Because ACMD41 instead of CMD1 is recommended for SDC, trying ACMD41 first and retry with CMD1 if rejected, is ideal to support both type of the cards.
This is what you’ll find in Sd2Card::init() in /libraries/SD/utility/SD2Card.cpp:
  while ((status_ = cardAcmd(ACMD41, arg)) != R1_READY_STATE) {
    // check for timeout
    if (((uint16_t)millis() - t0) > SD_INIT_TIMEOUT) {
      error(SD_CARD_ERROR_ACMD41);
      goto fail;
    }
  }
As you can see, it only tries the ACMD41 command until it gets a response or times out, and it’s at this point where my MMC card fails to “comply” with Arduino’s SD initialization! Old MMC cards respond to CMD1, not ACMD41! Implementing the website’s suggestion and trying CMD1 if ACMD41 gets rejected makes this code work for every card I own!
  status_ = cardAcmd(ACMD41, arg);
  while (status_ != R1_READY_STATE) {
    // check for timeout
    if (((uint16_t)millis() - t0) > SD_INIT_TIMEOUT) {
      error(SD_CARD_ERROR_ACMD41);
      goto fail;
    }
    // Switch to CMD1 if the card fails to recognize ACMD41
    if (status_ & R1_ILLEGAL_COMMAND) useCmd1 = true;
    status_ = (!useCmd1 ? cardAcmd(ACMD41, arg) : cardCommand(CMD1, 0));
  }
(you’ll obviously need to define CMD1 too. A good place to add this is SdInfo.h, with the other CMDx constants)
uint8_t const CMD1 = 0x01;
And also add useCmd1 to the method’s data declarations (inside init() somewhere in between the other variables used by the code),
bool useCmd1 = false;
With this, Arduino will be able to cope even with extremely old cards like my 16MB MMC.
Now, just as Elm-Chan’s website said, the SD Cards specs specifically advice against CMD1 initialization:
2.1mm SD Memory Card can be initialized using CMD1 and Thin (1.4mm) SD Memory Card can be initialized using CMD1 only after firstly initialized by using CMD0 and ACMD41. In any of the cases CMD1 is not recommended because it may be difficult for the host to distinguish between MultiMediaCard and SD Memory Card.
Their concern is having MMC cards recognized as SD Cards if the host were using CMD1 for initialization instead of ACMD41.
I don’t think we will run into problems with the quick hack I just outlined though, basically because in any case we are always trying ACMD41 first, and then, only if the command is not recognized by the card, we start trying with CMD1. In fact, this actually makes possible to distinguish between both types of cards, as only old MMC cards will respond to ACMD41 with “illegal command”.
I hope this serves as a good starting point for those who want to customize the included SD Lib for specific purposes or quick-patching it to support old MMC cards.
I’ll probably be using this in the custom code I’m writing for my project.
EDIT: I updated the last few paragraphs to better explain why the specs don’t recommend CMD1 initialization and also modified the hack to make it more robust and easier to add to Arduino’s Sd library.
EDIT2: Clarified a bit the instructions regarding the extra required declarations.


Hi Mr. E,
it seems I would be able to utilize my old 32MB MMC card. I am new in Arduino programing and I am not sure where to put those definitions / declaration lines. Could you please be more specific?
Thanks a lot!
Sure.
Modifications are done to the library code itself. First find where your Arduino libraries are located. For the SD libraries this normally is inside {Arduino Install Dir}/libraries/SD/(src). I’d recommend you to make a backup of that folder somewhere else before you modify anything, in case something goes wrong.
The initialization loop is inside the file /utility/SD2Card.cpp, as explained in the post. To be more precise, inside the Sd2Card::init function.
For the “extra declarations”, I already explained to someone else where to add them, and hopefully that explanation will help you as well.
If you need further assistance please let me know.
yes Mr E l was missing the file in the card.
Right now l am able to create a file in the card and read the content of that file
thanks a lot
Excellent! Thanks for reporting back.
hello Mr E l hope l found you well.
Thanks for the support now the sd card and proteus is working very well with no problem of initialization.
Simulation is now done successfully with sd card loading the required data without any problem.
Good day
Hi Lee,
Glad to hear you were able to figure it out. You were missing the file inside the emulated card right? It would be good to know if that solved the issue, because this whole conversation may help other people with the same or similar problem if they happen to stumble upon this post.
Take care and I hope you had a Merry Christmas.
thank you Mr E,l will keep updating you on the sd.
thank for supporting me.
l new on arduino microcontroller so this helps me to understand more
hey sir E .
l am doing GPS-GSM based vehicle data logging system for a school project.
Which is best arduino microcontroller for this project my teacher.
Which GSM and GPS moderns are good for it.
l am still working with SD card so far but not luck.
what can l do with this sd card simulation?
Thanks very much for your suggestions
It’s been a while since the last time I worked with GPS and GSM, so the boards I know are no longer being made, and were too complicated to begin with. I recommend you to search for boards with good software support (available libraries and examples) and also check forums and online communities to see if they commonly suffer from problems or if they work well under most conditions.
I think you are pretty close to getting the SD card thing working. Don’t give up.
You can look at those 2 codes sir
l jst fgt to put
#include
#include
.
The read/ write is giving me the following results :Initializing SD
card…initialization done.
error opening test.txt
test.txt:
Ok, so the card initializes successfully in both examples, but it fails the read/write test.
Does the file exist in your emulated SD card? Because the example tries to open the file for reading, but fails as it apparently doesn’t exist.
so u mean l ave to add a file in the sd card and then run the program.
lf so l have a question.
how can l write a new file in the sd
card.?
Well, if you were able to “format” the emulated card with FAT16 instead of FAT12 there should be a way of injecting files to the image. According from what I’ve seen online it creates a regular image file that you can edit with programs like winimage. Open your SD card image file and put a text file named exactly like the one you are trying to open, and the program should run.
//Read/write example
const int cs = 4 ;
void setup ()
{
Serial.begin( 9600 );
Serial.print( “Initializing
card…” );
// make sure that the
default chip select pin is
declared OUTPUT
pinMode( 10, OUTPUT);
// see if the card is
present
if (!SD.begin(cs))
{
Serial.println( “Card
failed to initialize, or not
present” );
return;
}
Serial.println( “card
initialized.” );
// open the file named
ourfile.txt
File myfile = SD.open
(“ourfile.txt” );
// if the file is
available, read the file
if (myfile)
{
while (myfile.available())
{
Serial.write(myfile.read
());
}
myfile.close();
}
// if the file cannot be
opened give error report
else {
Serial.println( “error
opening the text file” );
}
}
void loop ()
{
}
hello Mr E ..l.am not understanding what you are saying
//CARDINFO EXAMPLE
#include
#include
// set up variables using the SD utility library functions:
Sd2Card card;
SdVolume volume;
SdFile root;
// change this to match your SD shield or module;
// Arduino Ethernet shield: pin 4
// Adafruit SD shields and modules: pin 10
// Sparkfun SD shield: pin 8
const int chipSelect = 4 ;
void setup ()
{
// Open serial communications and wait for port to open:
Serial. begin ( 9600 );
while (!Serial) {
; // wait for serial port to connect. Needed for Leonardo only
}
Serial. print ( “\nInitializing SD card…” );
// On the Ethernet Shield, CS is pin 4. It’s set as an output by default.
// Note that even if it’s not used as the CS pin, the hardware SS pin
// (10 on most Arduino boards, 53 on the Mega) must be left as an output
// or the SD library functions will not work.
pinMode(SS, OUTPUT);
// we’ll use the initialization code from the utility libraries
// since we’re just testing if the card is working!
while (!card. init (SPI_HALF_SPEED, chipSelect)) {
Serial. println( “initialization failed. Things to check:” );
Serial. println( “* is a card is inserted?” );
Serial. println( “* Is your wiring correct?” );
Serial. println( “* did you change the chipSelect pin to match your shield or module?” );
}
// print the type of card
Serial. print ( “\nCard type: ” );
switch (card. type ()) {
case SD_CARD_TYPE_SD1:
Serial. println( “SD1” );
break ;
case SD_CARD_TYPE_SD2:
Serial. println( “SD2” );
break ;
case SD_CARD_TYPE_SDHC:
Serial. println( “SDHC” );
break ;
default:
Serial. println( “Unknown” );
}
// Now we will try to open the ‘volume’/’partition’ – it should be FAT16 or FAT32
if (!volume. init (card)) {
Serial. println( “Could not find FAT16/FAT32 partition.\nMake sure you’ve formatted the card” );
return;
}
// print the type and size of the first FAT-type volume
uint32_t volumesize;
Serial. print ( “\nVolume type is FAT” );
Serial. println(volume. fatType (), DEC);
Serial. println();
volumesize = volume. blocksPerCluster (); // clusters are collections of blocks
volumesize *= volume. clusterCount (); // we’ll have a lot of clusters
volumesize *= 512; // SD card blocks are always 512 bytes
Serial. print ( “Volume size (bytes): ” );
Serial. println(volumesize);
Serial. print ( “Volume size (Kbytes): ” );
volumesize /= 1024 ;
Serial. println(volumesize);
Serial. print ( “Volume size (Mbytes): ” );
volumesize /= 1024 ;
Serial. println(volumesize);
Serial. println( “\nFiles found on the card (name, date and size in bytes): ” );
root. openRoot (volume);
// list all files in the card with date and size
root. ls(LS_R | LS_DATE | LS_SIZE);
}
void loop (){
}
l then change FAT12 to FAT16. The results from CardInfo example are:
Initializing SD card…Wiring is
correct and a card is present.
Card type: SD1
Volume type is FAT16
Volume size (bytes): 254799872
Volume size (Kbytes): 248828
Volume size (Mbytes): 242
Files found on the card (name, date
and size in bytes):
l then run the Read/write example the result are:
Initializing SD
card…initialization failed!
any suggestions about that sir.
thank you
Hi, glad to see you are making progress. If the initialization for the CardInfo example succeeds, but the Read/Write doesn’t, then there’s a chance that the Read/Write example is pulling the init routines from somewhere else, and it’s not using the “fixed” version. Can you check what initialization code or routine is actually being used by the Read/Write example? Make sure that it’s the same used by the other example and contains the “fix”.
Hello Mr E ….
l think l have the problem .l used the arduino example with name CardInfo.It shows the
1. card type ; SD1
2.Volume type is FAT12
so l think the arduino library do not support the FAT12.
Any suggestion about this?
the code is writing to the sd card
the code still failing to initialize .
it is saying (MMC CMD) Command unsupported.
Thank you Mr E for quick response.
l did as you said.
In the first if statement of ACMD41, the statements inside were not executed.
The if statement of CMD1 was executed it showed the Serial.print() statements l added .
Mr E ,l. am using proteus design suite 8.0 and mmc which is provided with winimage.
l followed also steps in the khalid video but im not getting it.
Thanks sir um waiting for your suggestions.
I didn’t read that you were using Proteus on your first post, I apologize. As it’s an MMC card emulation (and because it failed ACMD41 and executed CMD1) it should have worked as it did for khalid.
Since that’s the last step of the initialization, I assume the whole init process was successfull right?
I’d be interested in knowing what the rest of your code does (read from the memory? write to it?) and what operation is exactly failing your tests.
hie Mr E
A very interesting article.
l copied the above code according to the instructions you gave us and the code complied well ..bt my proteus 8 still have the intialization error on MMC.
l am not sure where l am going wrong
.Can you help me.
thank you Mr E
Hi LeeChando, first time I hear of an MMC card not working with that code. I guess it’s still a possibility since there are several revisions to both MMC and SD standards, and the MMC specs is actually still evolving. There are modern MMC cards with some crazy improvements, for which this code may not work. Having said that, if you can inject several Serial.print() debugging statements between each cardAcmd() and cardCommand() call during the initialization you’d be able to determine which step the process fails.
If you can try that maybe I’d be able to help you with this. I’d be really interested in knowing where it’s failing.
https://www.youtube.com/watch?v=IVQa3yYLa7Q
I’m glad this helped you with your Proteus project.
And it’s quite flattering to see my blog featured in a video! Thanks!
You saved my day man:
Here is Arduino Proteus Sdcard video.
Hi friend, sorry to bother you.
I don’t know, but maybe you can help me.
I’m trying to modify SdFat by adding your hints.
Do you know SdFat library?
It’s pretty similar to the standard Arduino’s SD library but much better, even if actually now SD library is better of SdFat library cause it can also handle MMC thanks your work.
By adding to it your scripts I got these errors:
C:\Arduino\libraries\SdFat\Sd2Card.cpp: In member function ‘bool Sd2Card::begin(uint8_t, uint8_t)’:
C:\Arduino\libraries\SdFat\Sd2Card.cpp:317: error: ‘status_’ was not declared in this scope
I suspect the culprit can be due the fact SD library and SdFat library are similar but not the same.
For instance in SdFat there is ‘bool Sd2Card::begin(uint8_t, uint8_t)’:, no ‘bool Sd2Card::init(uint8_t, uint8_t)’:
Any clue, if you can?
Thank you!
Arduino jr
Hi!
As far as I understand the SD Card Library in Arduino is a sort of wrapper for the SDFat library, but they *may* be using an older version of SDFat, though.
I checked the last version of SDFat and the variable “status_” is now called “m_status”, so replacing every instance of “status_” in my code with “m_status” should do the trick (that seems to be the only change).
Hope that helps!
Thank you friend.
Indeed that does the trick, it works!
I wonder where have you been the whole time until now cause you are saving a lot of people with your knowledge.
My congratulations and respect.
Arduino jr
Hi Elias.
Very interesting article!
Me too I deal with MMC and SD very often.
I think your idea is the Columbus’ egg, I don’t understand some things though.
I have to premise I’m not so skilfull like Arduino’s programmer, anyway I have tried to change the standard SD2Card.cpp file adding your suggestions but it doesn’t work.
For instance I get many errors attempting to compile the CardInfo sketch.
More generally using my own modified SD2Card.cpp always I get errors with any related sketch.
I guess it’s because I’m not able to put “uint8_t const CMD1 = 0x01;” and “bool useCmd1 = false;” in the right place.
Could you explain more?
Thanks in advance.
OrSoOn
Hi,
Thanks for your kind words!
Now, about your problem: You’ll find a file called SdInfo.h in the same folder where the Sd2Card.cpp file is. This file contains most of the definitions used by Sd2Card.cpp. There you’ll see a lot of CMDxx constants defined so it’s the perfect place to add our CMD1.
bool useCmd1 = false; should be added to the variable declaration block inside Sd2Card::init(). You can add it after the “uint32_t arg;” line, or before “errorCode_ = inBlock …” or somewhere in between. The important thing is that it should be inserted before function calls and other statements inside init().
Hope that helps!
Hey man you are the number one!
Elias you are right I did do so and it works like a charms.
Terrific!
You really deserve the Oscar!
OrSoOn
Haha, thanks man!
Glad you got it working!